
How Certified Plumbers Remove Old Residential Sewer Lines
A Homeowner’s Guide
Replacing an old sewer line is a major project for any homeowner.
Understanding why sewer lines fail and how plumbers tackle the job can help you navigate the process with confidence.
In this guide, we’ll walk through common causes of sewer line damage, warning signs of trouble, and how certified plumbers inspect and remove old sewer lines.
We’ll also cover what to expect from traditional excavation and trenchless replacement methods, the final restoration steps, typical costs and timelines, and tips to maintain your new sewer line. Let’s dive in!
How Sewer Lines Get Damaged
Residential sewer lines are built to last, but they can deteriorate or break due to several common factors:
- Tree root intrusion: Tree roots naturally seek water and nutrients, and they can sniff out tiny cracks in sewer pipes. Over time, roots grow into the pipe, widening cracks and causing major blockages or breaks (Common Causes of Sewer Line Damage: Key Factors and Prevention Tips.). This is especially common in older clay or concrete pipes near large trees.
- Aging and corrosion: As pipes age, they become more vulnerable. Old cast iron or steel pipes may corrode from decades of chemical reactions with sewage and soil, weakening the walls until they crack or collapse (Common Causes of Sewer Line Damage: Key Factors and Prevention Tips.). Even heavy-duty materials have a lifespan – past a certain age, deterioration is inevitable.
- Soil shifting and settling: Ground movement can misalign or stress a buried sewer line. Natural soil settling, nearby construction, or vibrations can all lead to pipes bending or cracking. Regions with freeze-thaw cycles see this often – soil expands when frozen and contracts when thawed, flexing any pipes within it (Common Causes of Sewer Line Damage: Key Factors and Prevention Tips.) Over years, this movement can cause joints to separate or pipes to break.
- Freezing temperatures: In colder climates, a shallow sewer line can freeze solid during extreme cold. Ice expansion may crack the pipe from the inside. Once a pipe breaks, it’s prone to leaks and further damage when the ice thaws. Proper burial depth below the frost line helps prevent this, but older or improperly buried lines are at risk.
- Physical impacts: Although less common, external damage can occur. For example, a heavy vehicle driving or parking repeatedly over a shallow buried line can compress soil and eventually fracture the pipe. In some cases, home improvement digging or other utility work can accidentally hit and damage a sewer line if it’s not well-marked.
Understanding these causes can help homeowners take preventive steps (like careful landscaping and regular inspections) to protect their sewer lines. But if damage does occur, it’s important to recognize the warning signs early.
Signs of Sewer Line Issues
When a sewer line is cracked, clogged, or collapsed, it usually gives off some warning signs. Homeowners should watch out for these symptoms of a sewer line problem:
- Multiple slow or backed-up drains: If sinks, tubs, and toilets all seem to drain slowly or gurgle, it suggests a blockage or break in the main sewer line rather than a localized clog. For instance, a toilet that backs up when you run a sink or shower is a classic red flag (8 Signs of a Sewer Line Collapse | Orange Coast Plumbing). Gurgling sounds in pipes can mean air is trapped by a clog or break (8 Signs of a Sewer Line Collapse | Orange Coast Plumbing).
- Frequent sewage backups: Recurring backups or wastewater coming up through floor drains, bathtubs, or toilets indicate a serious obstruction or collapse. Sewage backflow into the home (often in the lowest drains like a basement floor drain) is a clear sign the wastewater has nowhere to go due to a sewer line issue (8 Signs of a Sewer Line Collapse | Orange Coast Plumbing).
- Foul odors: Smelling a strong sewer or rotten egg odor around drains, in the basement, or in your yard is often a sign of a leak or crack in the sewer line (4 Early Signs Your Sewer Line Is Breaking | Bonney). Sewer gas should never be noticeable if the system is intact. Persistent foul odors mean sewer contents are escaping somewhere – a plumber should investigate promptly for hidden leaks or breaks.
- Lush or soggy patches in the yard: An underground sewer leak acts like fertilizer. If one area of your lawn suddenly becomes very green and lush (or one patch of plants near the sewer line flourishes abnormally), raw sewage might be seeping into the soil there (4 Early Signs Your Sewer Line Is Breaking | Bonney). Likewise, you might notice the ground above the pipe is frequently wet or marshy without rain. These wet spots often come with a bad smell and can attract insects or rodents (4 Early Signs Your Sewer Line Is Breaking | Bonney). Over time, a saturated area can even develop a sinkhole.
- Sinkholes or yard depressions: In severe cases, a broken sewer pipe can wash away surrounding soil, causing the ground above to collapse. A visible dip or sinkhole in the yard (or under a driveway) along the sewer line route is a telltale sign of a collapsed sewer line (8 Signs of a Sewer Line Collapse | Orange Coast Plumbing). Even a shallow trench or depression forming in the lawn could indicate the soil is slowly eroding from a long-term sewer leak (Is Your Sewer Causing Sinkholes?). If you see this, stop using water and call a plumber immediately, as sinkholes pose safety hazards.
Any one of these signs is cause for concern. Often, several symptoms will occur together – for example, you might smell odors and have slow drains, or see a soggy patch and experience a backup. Don’t ignore these warnings. A professional plumber can confirm if the sewer line is the source of the issue.
Inspection & Diagnosis
When you suspect a sewer line problem, certified plumbers will perform a thorough inspection to diagnose the issue and pinpoint its location. Modern plumbing technology allows for a precise assessment with minimal guesswork:
- Video camera inspection: Plumbers commonly send a specialized sewer camera down the line to see exactly what’s happening inside the pipe. They access the sewer via a clean-out or by removing a toilet, and feed a flexible camera line through the pipe. This live video shows breaks, obstructions, root intrusions, or belly sagging in the line (Common Causes of Sewer Line Damage: Key Factors and Prevention Tips.). The camera also has a locator – on the surface, the crew can detect where the camera is and mark the exact spot of a break or clog. This way, they know where (and how deep) to dig if excavation is needed.
- Pipe condition tests: Besides the camera, plumbers may conduct other tests. One is a hydrostatic pressure test, where the sewer line is temporarily sealed and filled with water to see if pressure drops (indicating a leak) (Common Causes of Sewer Line Damage: Key Factors and Prevention Tips.) (Essential Checklist for Sewer Line Replacement). They might also do a smoke test by pumping non-toxic smoke to see if it escapes from cracks, or dye testing (flushing dye through the system and checking if it appears in the yard). These methods help confirm leaks and their locations.
- Diagnosis and options: Using the camera footage and test results, the plumber will determine the extent of the damage. Is it a single break or root intrusion that can be spot-repaired, or is the whole line aged and failing? They will also note the pipe material (cast iron, clay, PVC, etc.) and overall condition. With this information, the plumber can recommend the best removal or repair approach – whether a section of pipe needs replacing or if the entire sewer line should be replaced. They’ll also decide if trenchless methods (like lining or bursting) are viable or if a traditional excavation is necessary, based on how intact or accessible the old pipe is. All this diagnostic work is usually done before any heavy digging begins, so that the repair can be planned out efficiently.
By performing a careful inspection, plumbers minimize surprises during the actual sewer line removal. The result is a clear plan for fixing the problem in the safest, most cost-effective way for the homeowner.
Preparation for Removal
Once it’s confirmed that a sewer line must be replaced, there are several preparation steps before the old pipe can be removed. Homeowners and plumbers should work together to ensure everything is ready for a smooth, safe project:
- Permits and permissions: Major sewer work almost always requires permits from the local municipality. Your plumber (or you, if you’re the homeowner pulling the permit) will secure the necessary plumbing permit and/or right-of-way permit if the line extends into the public street area (Broken Sewer and Drain Lines- Guide to Repairs, Permits and Inspections | Portland.gov). This ensures the work is up to code and will be inspected. It’s crucial not to skip permits – doing so can lead to fines and unsafe conditions. The permit process may require a simple plan or diagram and a fee. Make sure all approvals are in place before digging starts.
- Locating utilities: Safety is paramount because other utilities (gas, water, electric, cable) often run underground near sewer lines. A few days before excavation, the plumber or homeowner will contact the local “Call Before You Dig” service (dial 811 in the US). Utility companies will come out to mark their lines on your property with paint or flags (Broken Sewer and Drain Lines- Guide to Repairs, Permits and Inspections | Portland.gov). This step prevents accidentally rupturing a gas line or cutting an electric cable during the sewer dig. If your sewer runs under a sidewalk or street, coordination with the city to mark public utilities and possibly reroute traffic may also be needed.
- Preparing the area: Homeowners should clear the work zone to give the crew easy access. Remove outdoor furniture, planters, or decorations along the path of the sewer line. If you have landscaping (shrubs, flower beds) where the trench will go, you might transplant or remove what you can beforehand, knowing that area will be disturbed (Essential Checklist for Sewer Line Replacement). In some cases, a shed or structure sitting over the sewer line might need to be temporarily moved. Plumbers will also locate or install an access point (like a sewer cleanout) if one isn’t present, to facilitate the repair. Discuss with your contractor what portion of the yard or driveway will be affected so you know what to clear.
- Home and neighborhood notifications: It’s wise to let family members know that sewer work is scheduled, because water and sewer service will be unavailable during the replacement. You won’t be able to use sinks, showers, or flush toilets for at least several hours or more, so plan accordingly (Essential Checklist for Sewer Line Replacement). Some families arrange to stay elsewhere for the day if a major line replacement is underway. If your neighbors might be impacted (for example, if work trucks could block a shared driveway or the street), give them a heads-up about the timing. This courtesy can smooth over any inconvenience caused by the construction activity.
- Equipment staging: Expect some heavy equipment on site. For a traditional dig, this may include a backhoe or excavator, dump truck for soil, and pallets of new pipe. The plumber’s team will typically have these lined up on the scheduled day. They might lay down plywood in the yard to protect it from the excavator’s treads and to pile dirt. As the homeowner, you might discuss where to park vehicles (you may need to keep your car out of the garage if the driveway will be cut, for example) and where the crew can best access your property.
With permits secured, utility lines marked, and the site ready, the plumbers can begin the process of physically removing the old sewer line. Good preparation helps avoid dangerous accidents and unexpected delays once the work is underway.
Traditional Excavation Method
The most established way to replace a sewer line is the traditional open-trench excavation method. In this process, the plumbing crew digs down to expose the old pipe, removes it, and installs a new pipe in its place. Here’s a step-by-step breakdown of how a certified plumber would remove an old sewer line using excavation:
- Site assessment and marking: Before any digging, the plumbers review the sewer layout and the problem areas. Using the inspection info, they mark the ground along the pipe’s route from the house to the street or septic tank. This shows where to dig. They also double-check that utility markings are clear (so they know where not to dig) (The Step By Step Process Of A Sewer Excavation Repair Or Replacement). At this stage, they plan the trench dimensions and gather needed tools, like shovels, an excavator, trench shoring boxes (to prevent collapse in deep trenches), and safety gear.
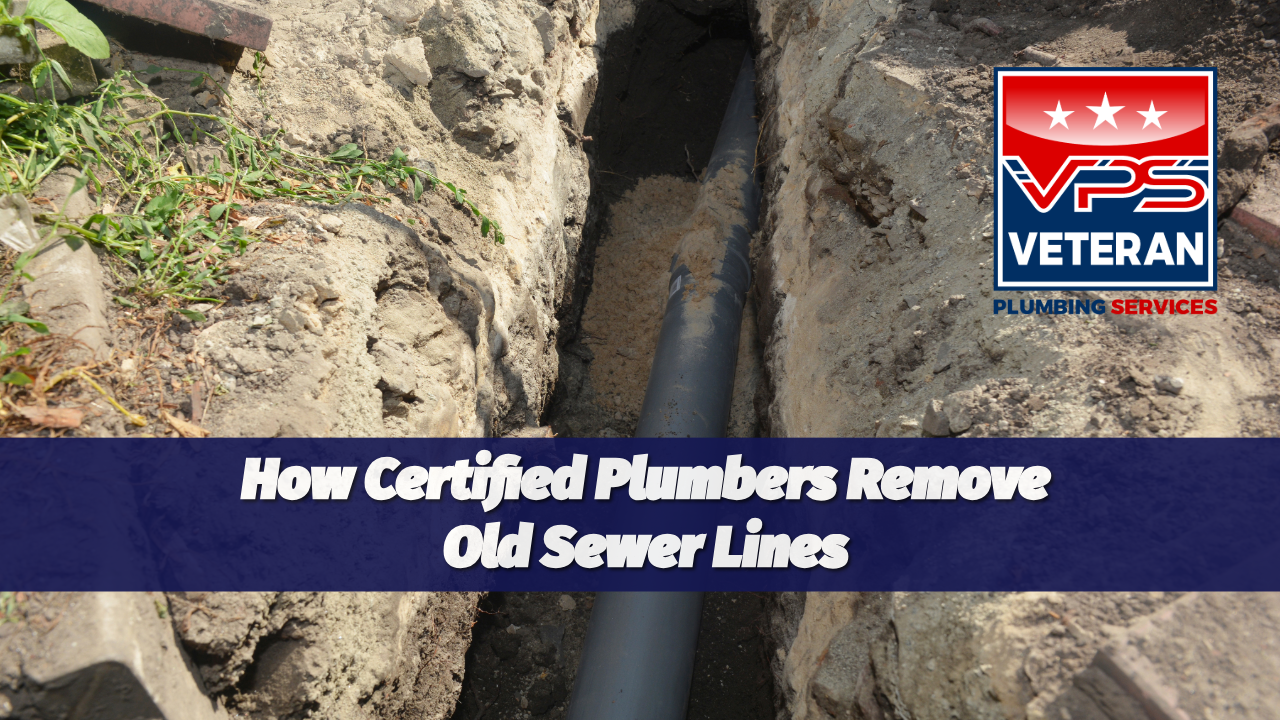
- Excavating the trench: The crew digs a trench to uncover the old sewer line. Depending on depth and length, they may use a backhoe or excavator for the bulk of digging, then shovels by hand as they get close to the pipe to avoid damaging it further. Typically, the trench will run along the path of the pipe and may be a few feet wide. All removed soil is piled to the side. The plumbers take care to shore up the trench sides if it’s deep and to work safely as they go. The goal is to fully expose the top and sides of the old pipe so it can be accessed (The Step By Step Process Of A Sewer Excavation Repair Or Replacement). In some cases (like spot repairs), they might dig a single hole down to the broken section rather than a long trench, but for a full replacement, a continuous trench is common.
- Removing the old pipe: With the pipe exposed, the damaged sewer line is taken out. Plumbers may cut the pipe into sections for easier removal, especially if it’s a long stretch or made of heavy cast iron. Any sewage still in the line is carefully drained or vacuumed out to avoid spills. If only a portion of the pipe is bad, they’ll cut out that section; if the entire line is being replaced, they will remove the pipe all the way from the house connection to the main sewer or septic inlet. Old pipes are hauled out of the trench and disposed of. This part can be messy, as decades-old sludge or roots inside the pipe might be present. The crew will use proper safety measures when handling wastewater. By the end of this step, the trench is empty and ready for the new pipe installation (The Step By Step Process Of A Sewer Excavation Repair Or Replacement).
- Installing the new pipe: Now it’s time to lay down the new sewer line. Typically, modern PVC pipe (or another durable material approved by code) is used to replace old clay or cast iron lines. The new pipe usually comes in multiple shorter sections that are then joined (either by solvent welding for PVC, or with rubber couplings, etc.). Plumbers will place the first section in the trench, connect it to the house’s sewer outlet pipe securely (often using a coupling to transition from old to new material), and then continue laying sections toward the street. They ensure a proper downward slope (grade) is maintained – usually a drop of 1/4 inch per foot is standard – so that gravity will carry waste through efficiently. The pieces of new pipe are joined tightly to prevent leaks. Finally, the end of the new line is connected into the city sewer main or the septic tank inlet. This connection might be via a saddle or fitting, and it’s crucial that it’s sealed and water-tight (The Step By Step Process Of A Sewer Excavation Repair Or Replacement). At this point, you have a brand-new sewer line in the ground in place of the old one.
- Initial testing and inspection: Before burying the new pipe, the plumbers will do a quick test to verify everything is working. They may pour water down your indoor drains or a hose to see that it flows through the new line without issue. They’ll check for leaks at joints and make sure the pipe is properly aligned. In many locales, an inspector from the city or county must examine the work while the trench is still open – they’ll verify that the new pipe and connections meet code. (For example, the inspector ensures the right type of pipe is used, proper slope, correct joint fittings, etc. (Broken Sewer and Drain Lines- Guide to Repairs, Permits and Inspections | Portland.gov).) Once any official inspection is passed and the plumbers are satisfied that the new sewer line is sound, they move on to the final steps of backfilling and restoring the area.
Traditional excavation is reliable because it physically removes the old damaged pipe and puts a brand-new one in place that you can expect to last for decades. However, as you can imagine, it does tear up the yard. That’s why plumbers sometimes recommend trenchless methods as an alternative. But open-trench replacement is still the go-to solution for severely damaged lines or when trenchless isn’t feasible. Next, we’ll explore those less invasive trenchless techniques.
Trenchless Sewer Line Replacement
In many cases, certified plumbers can replace an old sewer line without digging a continuous trench across your property. Trenchless methods allow for pipe repair or replacement with minimal excavation, preserving your lawn and landscaping. Two common trenchless techniques are pipe bursting and pipe lining. Here’s how they work and why they’re beneficial:
- Pipe Lining (Cured-In-Place Pipe): Pipe lining creates a new pipe inside the old pipe. Plumbers start by clearing the sewer line of any debris or roots (often with a hydro-jet or auger) so the lining can fit. Then, they insert a flexible tube coated with epoxy resin into the damaged pipe, usually through an existing access like a cleanout. This is known as CIPP – Cured-In-Place Pipe (Essential Checklist for Sewer Line Replacement). The liner is pulled or pushed through the old sewer line until it spans the entire length of pipe that needs renewal. Once in position, the resin-soaked liner is expanded (either with air pressure or a bladder) to press against the inner walls of the old pipe. It’s then left to cure. The resin hardens, turning the liner into a solid, seamless new pipe within the old pipe (Essential Checklist for Sewer Line Replacement). Finally, the plumber cuts out openings where there are any branch connections (for example, if your line has junctions) and inspects the work. The result is a smooth, jointless new sewer line running through the path of the old one, all accomplished with little or no digging in your yard. Pipe lining is great for fixing leaks and minor cracks, and it can last for decades. However, it does slightly reduce the interior diameter of the pipe, and it can’t be done if the old pipe is collapsed or extremely misaligned (since the liner needs a channel to travel through).
- Pipe Bursting: Pipe bursting is a method to fully replace the sewer pipe by destroying the old one and pulling in a new one at the same time. Unlike lining, which leaves the old pipe in place, bursting breaks apart the old pipe. How it works: the crew digs two small pits or access holes – one near the start of the sewer line and one near the end. The new pipe (often a continuous piece of HDPE or PVC) is prepared to be pulled through. They attach a special bullet-shaped bursting head to the front of the new pipe. Using a winch or hydraulic machine, they pull this head through the old sewer line. The bursting head breaks the old pipe into fragments, pushing those pieces outward into the surrounding soil, while towing the new pipe right behind it to occupy the space (Essential Checklist for Sewer Line Replacement). Essentially, the new pipe forces out the old one. Once the bursting head emerges at the far end pit, the new pipe is fully in place. The plumbers then connect the new pipe to the house and the main at the pits. Pipe bursting can even allow upgrading to a larger diameter pipe, since it opens up a cavity by shattering the old line. It’s an excellent solution for severely damaged pipes or complete line replacements without open trenching (Essential Checklist for Sewer Line Replacement). It does require the soil around the old pipe to be able to absorb the fragments (most soil types handle this fine). Very hard obstructions or a collapsed pipe might complicate things – in those cases, a segment of the line might still need to be dug up.
- Advantages of trenchless methods: Trenchless sewer replacements have become popular because they minimize damage to your property. Instead of ripping up a long trench through your lawn, driveway, or garden, these methods require only small entry points. That means your beautiful landscaping or expensive patio mostly stays intact. Trenchless work is also usually faster – often completed in one day, sometimes even in a matter of hours for a lining job ( Trenchless Sewer Repair vs. Traditional Excavation ). Less digging also means less heavy labor and often lower overall cost when you factor in that you won’t need to redo your yard or pavement. (While trenchless techniques can have a higher upfront price per foot, you save on restoration; in many cases, trenchless ends up saving money over a full excavation when all costs are considered (Trenchless Sewer Line Piping Costs [2025 Data] | Angi) (Facts About Excavation & Sewer Line Repair – Sky Heating, AC, Plumbing & Electrical).) Another benefit is reduced disruption: you can often stay in your home during the repair, and there’s less noise and less mess. As soon as the new liner or pipe is in place, you can resume normal water use, sometimes the very same day ( Trenchless Sewer Repair vs. Traditional Excavation ). Do keep in mind, trenchless methods aren’t suitable for every situation – if the old pipe is flattened or the soil is extremely unstable, traditional excavation might still be needed ( Trenchless Sewer Repair vs. Traditional Excavation ). A good plumber will assess and tell you if trenchless is an option. But when it is, homeowners often appreciate avoiding the giant trench and lengthy restoration that comes with the old dig-and-replace approach.
In summary, trenchless sewer line replacement is a technologically advanced option that can solve the same problems as an open excavation, with far less hassle for the homeowner. Whether via lining or bursting, you end up with a robust new pipe. Your plumber will guide you on which method (or sometimes a combination of methods) makes the most sense given your sewer line’s condition.
Final Steps & Restoration
After the old sewer line is removed and the new line is installed (by either method), the project isn’t finished until everything is tested and the property is restored. Certified plumbers take several final steps to ensure the new sewer line is working properly and your home and yard are put back in order:
- Testing the new line: Once the new pipe is in place, the plumbing team will perform tests to verify that the sewer line functions correctly before burying it. A common check is a water flow test – running water from the house through the line and observing how quickly and smoothly it drains to the main sewer (Essential Checklist for Sewer Line Replacement). They’ll look inside via a camera or visually check any open segment for leaks at the joints while water is flowing. If the jurisdiction requires it, the line might be filled and pressure-tested or inspected by an official. Any sign of leakage or improper slope is addressed now. The plumber will also ensure that all branch connections (like those from various bathrooms) are securely tied into the new main line and nothing was missed. Essentially, this is a “quality control” step to catch any issues while the pipe is still accessible (Essential Checklist for Sewer Line Replacement). When everything checks out – good flow, no leaks, and passing any required inspections – they proceed to cover the pipe.
- Backfilling the trench: If an excavation was done, the open trench (or pits, for trenchless jobs) must be refilled. The crew will push the previously excavated soil back into the trench, or sometimes use imported fill dirt if the old soil was unsuitable. Backfilling is typically done in layers: they shovel or bulldoze soil in, then compact it, then add more, to ensure the ground doesn’t settle too much later. Large rocks or debris are kept out so they don’t damage the pipe. Proper compaction is important – the plumbers may use tamping tools or even water to help the soil settle around the new pipe. The goal is to return the ground to its original level and stability. After backfilling, there might be a little excess soil (since compacted soil can mound up); the crew often leaves a small mound knowing rain will help it settle more. In any case, they’ll make sure the pipe is securely buried and the site is safe and even. For trenchless replacements with minimal digging, backfilling is only needed for the small access pits. Those holes are filled and tamped down carefully as well.
- Restoring surfaces and landscaping: The final stage is cleaning up and restoring the areas that were disturbed. A good contractor will try to leave your property as close to pre-work condition as possible. This may involve replacing sections of sod or re-seeding grass over the trench line, replanting any small shrubs that had to be moved, and replacing soil and mulch in flower beds. If part of a sidewalk or driveway was removed, they will refill and level the base and then pour new concrete or lay new asphalt as needed (sometimes this is done a few days later to let soil settle, or a separate concrete crew might handle it). For example, if a concrete slab was cut to reach the pipe, you’ll get a new concrete patch there, and it should be smooth with the rest of the slab once cured. The workers will also haul away any remaining debris, old pipe pieces, or excess soil. Essentially, they clean up the job site. While your lawn or garden might not look perfect immediately after (a new grass seed patch will take time to grow in, for instance), the major disruptions should be repaired. Within a short time, you’ll hardly know the yard was excavated. The idea is that aside from having a brand-new sewer line, your property should look just about the same as it did before the work (The Step By Step Process Of A Sewer Excavation Repair Or Replacement).
After everything is wrapped up, the plumber will typically give you documentation – perhaps confirmation that the line passed inspection, any video footage from the camera inspection, and advice on care for your new sewer line. You can now breathe a sigh of relief that the old problematic sewer line is gone and a reliable new one is in service.
Costs & Timeframe
One of the biggest questions homeowners have about sewer line replacement is “How much will this cost and how long will it take?” The answer can vary widely based on your specific situation, but here are some general guidelines:
- Costs: Sewer line replacement is a significant investment. The price depends on the length of the line, the depth and location, the method used, and local rates. Traditional excavation tends to be priced by the foot; it can range roughly from $50 to $200 per linear foot of pipe, depending on difficulty (How Much Does a Sewer Line Replacement Cost?). Trenchless methods (lining or bursting) are in a similar ballpark, roughly $60 to $250 per foot (How Much Does a Sewer Line Replacement Cost?), sometimes a bit more due to specialized equipment. For an average home with about 50 feet of sewer line, costs often land in the several thousand dollar range. Nationally, many homeowners pay somewhere around $3,000 to $5,000 for a full replacement (How Much Does a Sewer Line Replacement Cost?), but the range is broad – simple fixes might be closer to $1,500, while very extensive projects (long runs, deep pipes, or involving street work) can go well over $10,000 (How Much Does a Sewer Line Replacement Cost?) (How Much Does a Sewer Line Replacement Cost?). Always get a detailed estimate. Remember to factor in permit fees (which could add a few hundred dollars up to ~$1,000 in some areas) (How Much Does a Sewer Line Replacement Cost?) and restoration costs. If your job requires tearing up landscaping, decks, or driveways, there will be expenses to put those back (for example, laying new asphalt or concrete, which can cost $4–$12 per square foot for a driveway or sidewalk section (How Much Does a Sewer Line Replacement Cost?)). Trenchless jobs might avoid a lot of those extra restoration costs. Your plumber should outline all these factors in the quote. While sewer replacement isn’t cheap, keep in mind it’s a long-term fix that can prevent ongoing repair bills and property damage from leaks or backups.
- Timeframe: The duration of a sewer line replacement also varies by method and scope. Trenchless replacements are usually fastest – often completed in a single day ( Trenchless Sewer Repair vs. Traditional Excavation ). For instance, pipe lining might take just 4-6 hours of work (plus curing time), and pipe bursting can often be done in one full day as well. Traditional excavations typically take longer because of the extensive digging and filling. Most residential sewer replacements via open trench take about 1 to 3 days of work (How Long Does It Take To Replace A Sewer Line | Emergency AC). That would cover a day of digging and removal, a day of laying new pipe, and another for backfill and surface restoration, for example. Of course, a small dig to fix one section might be done in a long afternoon, whereas a very large project (say, 100 feet of sewer line under a complicated terrain) could stretch to a week. There’s also the scheduling of inspections to consider – you might have to wait for an inspector at a certain stage, which can add a day. Weather can be a factor too; heavy rain could delay trench work. Your plumbing contractor will give a projected schedule. Generally, plan for at least a full day without sewer service, and possibly a couple of days of on-site work. The good news is that with trenchless tech and efficient crews, many sewer line jobs are started and finished within 24-48 hours. Either way, once it’s done, you’ll have a fully functioning sewer system again.
Every home is unique, so costs and timelines can differ. It’s smart to get multiple quotes if you can and compare not just price, but method and included services (like who handles permits and yard repair). Also check whether your homeowner’s insurance or home warranty covers any of the sewer line replacement cost – often they do not, but it’s worth asking. Knowing the expected expense and time can help you plan and avoid surprises.
Preventing Future Issues
After investing in a new sewer line, you’ll want to keep it in great shape. While some causes of sewer problems are out of your control (like natural ground shifts), good habits and maintenance can significantly extend the life of your sewer line. Here are some tips to prevent future issues:
- Watch what you flush and pour: The easiest way to prevent clogs and damage is to be mindful of what goes into your drains. Only flush human waste and toilet paper – no wipes (even “flushable” ones), paper towels, feminine products, or other garbage. In sinks, avoid washing down fats, oils, or grease; those can harden inside pipes and trap other debris (Essential Checklist for Sewer Line Replacement). Instead, let them cool and throw them in the trash. Food scraps should go in the trash or compost, unless you have a garbage disposal and even then in moderation. Harsh chemicals can also degrade pipes, so don’t routinely dump strong cleaners down the drain. By keeping inappropriate items out of your plumbing, you reduce the chances of a blockage forming in your sewer line (Common Causes of Sewer Line Damage: Key Factors and Prevention Tips.).
- Regular inspections and cleaning: Just like an annual check-up, it’s wise to have periodic inspections of your sewer line. Every couple of years (or annually if you’ve had frequent issues), hire a plumber to do a quick sewer camera inspection of the line. This can catch early warning signs – for example, beginning stages of root intrusion or minor cracks – so you can address them before they become big problems (Common Causes of Sewer Line Damage: Key Factors and Prevention Tips.). Additionally, consider routine drain cleaning. Plumbers can perform hydro-jetting, which uses high-pressure water to scour the inside of the sewer pipe and keep it clear of grease buildup or tree root tendrils (Essential Checklist for Sewer Line Replacement). Regular maintenance cleanings might be recommended every few years if your line is prone to clogging (for instance, if you have many trees or old plumbing). Think of it as preventative maintenance for your sewer, much like pumping a septic tank or servicing an HVAC system.
- Protect against tree roots: Since tree roots are a leading cause of sewer damage, managing vegetation is important. When landscaping, avoid planting new trees or large shrubs directly above or near your sewer line path. If you do plant near it, choose slow-growing, small-rooted species and consider installing root barriers in the soil to direct roots away from pipes (Common Causes of Sewer Line Damage: Key Factors and Prevention Tips.). For existing trees that are already mature near the sewer, keep an eye on them. You might proactively have a plumber cut out any roots in the line each year (some homeowners with root issues do an annual or biannual root-clearing). There are also safe chemical root killers that can be applied in the line to deter root growth. If a particular tree repeatedly invades the sewer, you may face the tough choice of removing it to save yourself future repairs. The new sewer line itself could be made of root-resistant materials and have fewer joints, which helps. But staying vigilant with nearby tree roots will ensure they don’t get a chance to intrude again (Essential Checklist for Sewer Line Replacement).
- Avoid stressing the system: Be mindful of how you use your plumbing. Extremely heavy water usage in a short time can flood the sewer line. For example, doing laundry, running the dishwasher, and taking back-to-back showers simultaneously puts a big volume of water into the sewer at once. It’s not usually a problem for a healthy line, but if there’s any vulnerability, it could back up. Try to space out major water-consuming tasks. Also, if you live in an area with known sewer backup issues from the municipal side, ask your plumber about a backwater valve. This device (installed in your line) prevents sewage from flowing backward into your home from the city sewer (Common Causes of Sewer Line Damage: Key Factors and Prevention Tips.). It’s a smart addition in some cases to avoid neighborhood sewer surges from affecting you. Essentially, treat your sewer system kindly: a little common sense in usage goes a long way.
- Prompt attention to any problems: Finally, don’t ignore small signs of trouble. If you hear gurgling in a drain weeks or months down the line, or notice a bad smell or one fixture draining slowly, take action early. Call a plumber to check it out. A quick snake or hydro-jet cleaning could resolve the issue and prevent a recurrence of the bigger problem. Since your new line is likely under warranty (many plumbers warranty their work for a period of time), it’s worth having them inspect anything suspicious. Addressing minor issues promptly keeps them from snowballing into major damage (Essential Checklist for Sewer Line Replacement).
By following these maintenance tips, you’ll greatly increase the chances that your new sewer line will serve you trouble-free for many decades. Sewer lines typically can last 50+ years, especially modern PVC pipes, if properly cared for (Trenchless Sewer Replacement: Top 5 Proven Benefits). A little preventative care and smart usage will protect your investment and give you peace of mind.
Having a sewer line replaced is a big project, but knowing what to expect can make it far less daunting.
From understanding the causes and signs of sewer trouble, to seeing how plumbers diagnose the issue and carry out the removal, to being aware of the costs and how to maintain the new line – you’re now equipped with knowledge that puts you in control as a homeowner.
If you’re facing a sewer line replacement, be sure to hire a qualified, licensed plumber who will do the job right. With the right plumbers and the right method, you’ll have a smoothly flowing sewer system and a safe, sound home for years to come.
